So, about a year after I redeployed my in-house staging cluster, I’ve reached a point where I’m not happy about the addressing scheme I’ve used and how it affects the routing on my internal network. So this article is going to try to cover the steps I took to re-number the whole cluster, and put all the nodes into their own LAN segment too to physically segregate/isolate it’s traffic for performance and security reasons.
WARNING: This process involves downtime. If you need to do this for a production cluster and need zero downtime, my best advice would be to run up a fresh cluster with the correct addressing scheme and use load balancers to migrate workloads to the new cluster before shutting down the old cluster.
Preparation
It should be noted that the cluster uses ’native routing’ and we’re using BGP internally. The cluster is running Cilium CNI and kube-router to exchange routes. I have assigned my staging cluster the ASN ‘65020’ so it makes sense (to me at least) to allocate VLAN 20 for this purpose, and try to use ‘10.20.0.0/16’ as the containing subnet.
I’ve decided how I want to divide up the IP range to ensure plenty of capacity.
The physical range will look like this:
Configure spare LAN port on router
I would like to physically segregate the traffic between my default in-house LAN (i.e. VLAN 1) and the cluster. To do this, I’m going to connect a spare port on the router to a spare port on the ’top-of-rack’ switch via the patch panel in the server cabinet.
Side note: This is a ’no name’ OPNSense hardware device described in an earlier article. It’s now three years later and I am still really pleased with it, but now I can’t seem to source an equivalent to use as a CARP failover for my Internet gateways. I may have to consider alternatives instead, or maybe just put some Mikrotik RouterBOARD devices up front.
Configure VLAN ports on switch
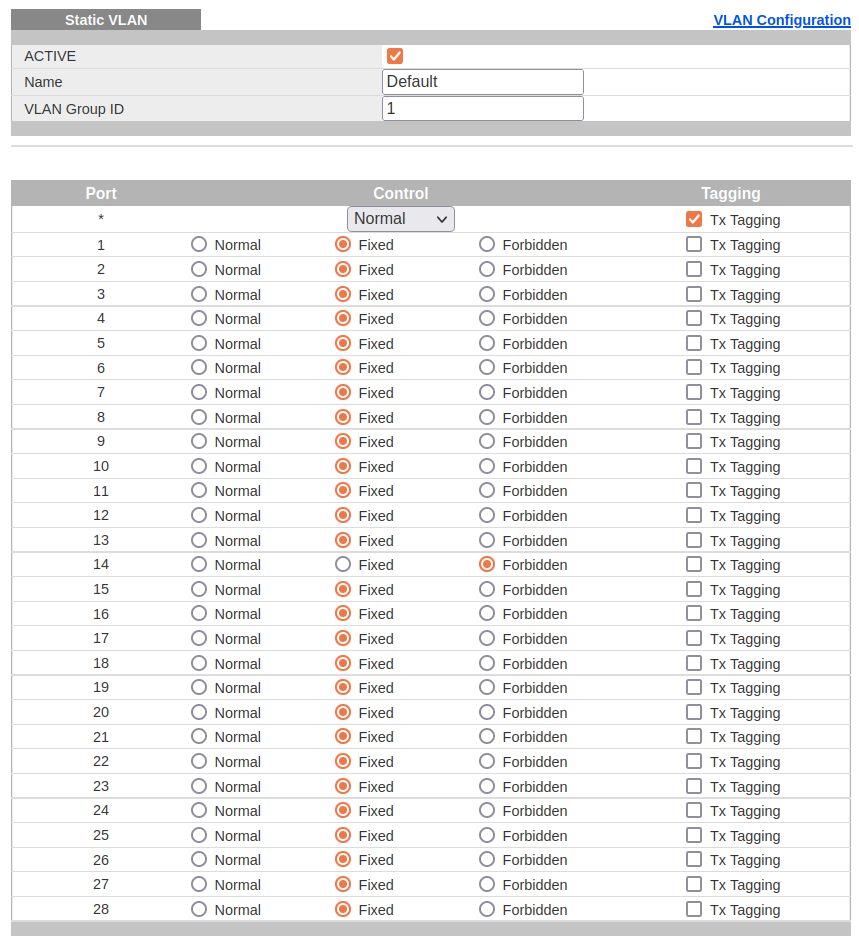
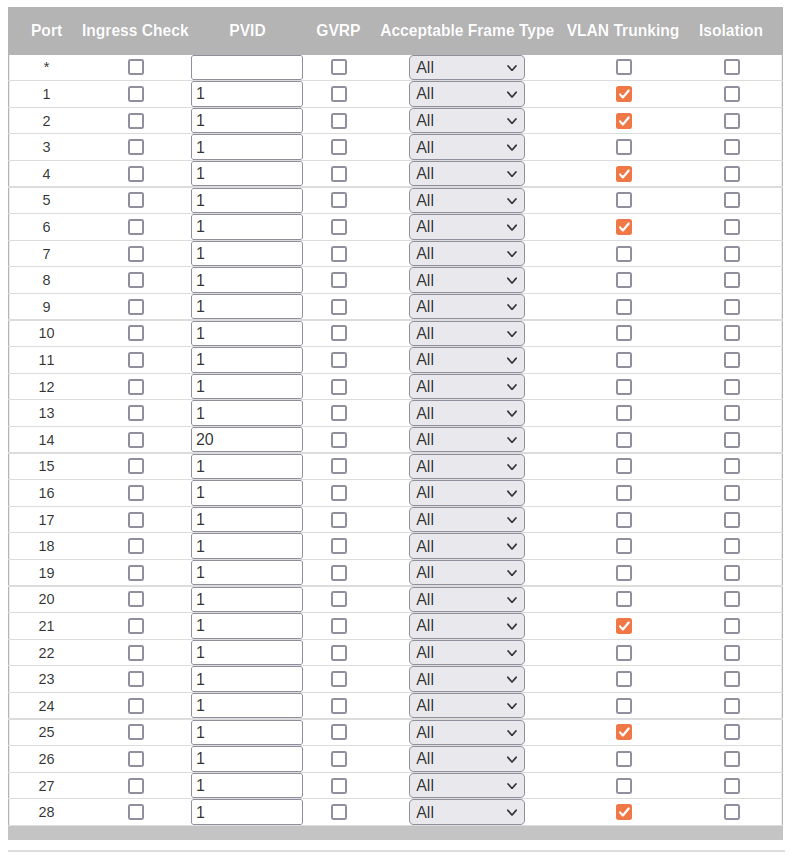
The top-of-rack switch is a Zyxel GS2210-24. I added the new VLAN definition to the switch configuration. I then configured the relevant router ports for VLAN20:
Also, I also allowed the switch port my laptop dock and desktop machines connect to to send VLAN-tagged packets. This helps save time and energy by allowing me to debug network issues at my desk with without having to wander around the place hooking up keyboards and monitors.

Configure spare LAN port on router (continued)
In the OPNSense configuration I configure the third ethernet port accordingly. Details from the ‘Interface Assignment’ page:
Then, go to the STAGING interface page and enable the interface, set the IP address as the 10.20.0.1 gateway address for the subnet. A quick ‘ping’ should confirm the address is reachable from the LAN.
Router firewall
Next, go to the Firewall Rules page for the STAGING interface and allow egress traffic, and inbound connections from the LAN subnet. In a production environment, you might want to lock the inbound rules down further by specific ports/addresses etc. for more depth of defence.
- The ‘Traffic from LAN’ rule allows inbound traffic from LAN to the subnet.
- The ‘Egress traffic’ rule allows outbound traffic from the subnet to anywhere.
Backup router configuration
At this point, I would normally consider downloading and save a new backup of the updated configuration. However, OPNSense is pretty cool in that I have configured it to use an internal (GOGS-based) git repo and it will push any configuration changes to that repo nightly. This repo also notifies me of commits via a Discord channel, so I get a little oversight of whether any automatic, or unexpected/malicious changes have been made. However, it only updates overnight, so notice of malicious changes may be too late, so I rely more on other intrusion detection systems (i.e. Suricata) instead for that sort of thing.
Update documentation
Once connected, I make sure to update the details in our Netbox instance to reflect this change, and add a Journal entry to the router object to record the change. You may also have other internal diagrams or documentation that would need to be manually updated at this point, or procedures you need to follow.
In a future article, I will try to cover the automation that is based on Netbox that helps alleviate the toll involved in the following tasks:
- Post details from the journal entries to our monitoring system, where they create timeline events in our central event log, which can be super-imposed onto various Grafana graphs to help quickly visually identify any correlatation between specific configuration changes may have been related to particular behaviour changes or issues.
- Use the new hostname and IP details to create dynamic DNS entries in an internal ‘coredns’ deployment, that help us avoid the need to maintain ‘hosts’ entries and/or remember too many IP addresses. Will become more of a need as IPv6 becomes more relevant.
- Regenerate any re-publish and physical/logical diagrams that show network cabling of IP routing maps.
Configure K8S API server
The API URL for the cluster is https://k8s-staging-api:6443, and k8s-staging is resolved via a local /etc/hosts entry on the nodes pointing to the master node’s IP address. The master node entry just points to 127.0.1.1 a.k.a localhost. This isn’t perfect, but it is simple and uncomplicated and works, which is fine for now.
- Update the
/etc/netplan/...network configuration to reflect the new IP settings. - Do a recursive search’n’replace to update the IP address in the
/etcfolder.- Carefully check the search first before performing the replace. Make sure you’re not going to affect files you wouldn’t expect to want to change (i.e. binary files, backup files etc).
cd /etc/kubernetes
mv pki *.conf /tmp
kubeadm init --ignore-preflight-errors=all --v=5 \
  --apiserver-cert-extra-sans=k8s-staging-api \
  --control-plane-endpoint=10.20.0.10 \
  --service-cidr=10.20.4.0/22
- Reboot the server.
- Log back on to check you haven’t lost access or misconfigured anything.
- If you have, you’re on your own here! Get out your network debugging toolkit (i.e.
tcpdump).
- If you have, you’re on your own here! Get out your network debugging toolkit (i.e.
Now you
Configure K8S nodes
Now do the same changes as above on the worker nodes.
Before rebooting, one extra step you should make is to update the k8s-staging-api alias to point to the new master node IP in the /etc/hosts file so it hooks back up to the cluster cleanly when it comes back up.
At this point, the Node and CiliumNode resources in the cluster need their host and pod CIDR IP address range settings updated. I did this as follows:
kubectl get nodes -oyaml | \
  sed 's;172.16.23;10.20.66;g' | \
  sed 's;172.16.2.117;10.20.0.66;g' > nodes.yaml && \
  kubectl delete -f nodes.yaml && \
  kubectl apply -f nodes.yaml
kubectl get ciliumnodes -oyaml | \
  sed 's;172.16.23;10.20.66;g' | \
  sed 's;172.16.2.117;10.20.0.66;g' > ciliumnodes.yaml && \
  kubectl delete -f ciliumnodes.yaml && \
  kubectl apply -f ciliumnodes.yaml
If you’ve got more than a handful of nodes you might want to script it some. I just did my three node cluster by hand.
Another place that needs updating is the Cilium Helm release, which includes the k8sServiceHost and clusterPoolIPv4PodCIDR values, if they are set.
Once applied,
Next, the same change needs to be made for all the services in the cluster.
kubectl get services -A -oyaml | \
  sed 's;172.16.23;10.20.66;g' | \
  sed 's;172.16.24;10.20.64;g' | \
  sed 's;172.16.25;10.20.65;g' | \
  sed 's;172.16.;10.20.65;g' | \
  sed 's;172.16.2.117;10.20.0.66;g' > services.yaml && \
  kubectl delete -f services.yaml && \
  kubectl apply -f services.yaml
I then killed all the pods with a pod IP in the old range.
kubectl get pods -A -owide \
  | grep 172.16 \
  | awk '{ printf "kubectl delete pod -n %s %s --wait=false\n", $1, $2 }' \
  | bash